
You work with double-entry accounting every day when balancing books for your clients, but what does it mean?
What is Double-entry Accounting?
Double-entry accounting is the discipline of recording each transaction in two places so that your ledger never drifts from the core equation (Assets = Liabilities + Equity).
No matter what kind of transaction you’re recording, sales, expenses, or payments, this equation must always hold true. That’s what keeps your books accurate and reliable. Every journal entry you post increases one side of that equation and decreases the other side, so the totals stay balanced.
Double-entry accounting is key to catching errors, tracking a business’s financial health, and preparing solid financial statements.
The system dates back to the 1400s, when an Italian mathematician named Luca Pacioli, often called the “Father of Accounting,” described it in his writings. Over 500 years later, the same principle of balance makes double-entry indispensable for producing error-free books, accurate financial statements, and audit-ready records.
When you follow it, you’re preserving the integrity of the financial story your firm tells its clients and stakeholders.
That’s the big picture, but let’s take a closer look at what double-entry accounting means in practice, and why it’s still the backbone of reliable bookkeeping today.
The Core Principle: Debits and Credits
With double-entry accounting, there will always be two familiar players: debits and credits. Debits increase certain types of accounts, and credits increase others.
It’s not about “good” or “bad,” or money coming in versus going out. It’s about direction, what account is being affected, and how.
Let’s break it down.
Rules of Debits and Credits
Every account in your chart of accounts falls into one of two categories: it’s either increased by a debit or by a credit. Knowing which is which is key to making accurate entries.
The basic rule is that debits grow your assets, expenses, and owner withdrawals, while credits grow your liabilities, equity, and income.
So, when you buy a new laptop for the office, you debit the asset account (equipment) and credit cash or accounts payable. When a client pays an invoice, you debit cash and credit accounts receivable or revenue, depending on how the payment is tracked.
Here’s a quick reference table:
| Account Type | Increased By | Decreased By |
| Assets | Debit | Credit |
| Expenses | Debit | Credit |
| Dividends/Drawings | Debit | Credit |
| Liabilities | Credit | Debit |
| Equity (Capital) | Credit | Debit |
| Revenue (Income) | Credit | Debit |
How to Use Double-Entry Accounting: Step-by-Step Guide
Now that you understand how double-entry works in theory, let’s walk through how to apply it in practice.
Step 1: Identify the Transaction
Before you touch the ledger, you need to know exactly what’s going on. That starts with identifying the financial event that took place.
Ask yourself, what happened? Was something sold, purchased, earned, paid, or borrowed?
A transaction could be anything from a client receiving payment to purchasing supplies to accruing interest on a loan. It doesn’t always involve cash. It could involve credit, assets, or internal adjustments.
You’re capturing financial activity that affects the business. That means reviewing documents like invoices, bank statements, sales receipts, bills, contracts, or internal memos. These give you the context you need to decide if something should be recorded, and how.
Step 2: Identify the Accounts Affected
Once you’ve identified the transaction, your next task is to figure out which accounts it touches. This is a crucial step because double-entry accounting only works if each movement of money or value is correctly tied to the right accounts.
Start by asking, what’s being given? What’s being received?
These two questions will usually point you to the two main accounts involved.
For example, if your client pays rent, the business is giving up cash and receiving the benefit of space usage. That means the accounts affected are cash (an asset account that’s decreasing) and rent (an expense account that’s increasing).
In some cases, more than two accounts might be involved, like when you split a transaction across multiple account types. That’s perfectly fine. What’s not okay is having only one side of the transaction. There must always be at least one debit and one credit.
Step 3: Determine the Account Types
Now that you’ve identified which accounts are affected by the transaction, it’s time to classify each one. This step is critical because it lays the groundwork for how you’ll apply the debit and credit rules next.
Every account in your chart of accounts fits into one of five main categories:
- Assets – What the business owns (e.g., cash, inventory, equipment, accounts receivable). Read more on: Assets it in accounting.
- Equity – The owner’s claim on the business (e.g., capital, retained earnings, owner’s drawings). We cover it in detail here: equity in accounting.
- Expenses – Costs incurred to operate the business (e.g., rent, salaries, utilities, office supplies). Go in depth: Expenses in accounting.
- Liabilities – What the business owes (e.g., loans, accounts payable, accrued expenses). Learn more about: Liabilities in accounting.
- Revenue – Income earned from business operations (e.g., sales, service income, interest income). For more insights: Revenue in Accounting.
Take the time to assign each account involved in the transaction to one of these categories. Getting this part right is essential because whether you debit or credit a given account depends entirely on its classification.
Step 4: Determine the Effect (Increase or Decrease)
Once you’ve identified the accounts involved in the transaction, your next step is to figure out what’s changing. For each account, ask: is this account increasing or decreasing as a result of the transaction?
Let’s say your client pays $500 in office rent. You’ve already identified the accounts:
Cash and Rent Expense. Now, determine the effect:
- Cash is going down (it’s decreasing)
- Rent Expense is being recognized (it’s increasing)
This step matters because the direction of change determines whether you’ll debit or credit each account. The goal here is to understand the story the transaction is telling. Once you’re clear on which accounts are going up and which are going down, you’re ready to apply the debit and credit rules in the next step.
Step 5: Apply Debit/Credit Rules
This is where the double-entry system kicks in to keep your books balanced. If an account is decreasing, the opposite rule applies.
Each side of the transaction should mirror the other, keeping your books in perfect balance. If you apply the rules consistently, you’ll always know your Trial Balance will line up, your reports will make sense, and your audit trail will hold up.
Step 6: Record in the Journal Entries
Once you’ve identified the correct accounts and applied the debit and credit rules, the next step is to record the transaction in your journal.
Think of the journal entry as your first draft of the financial story; it captures in chronological order, providing a clear trail of what happened, when, and why. Each journal entry should include:
- The date the transaction occurred
- The accounts affected, with debits listed first and credits underneath
- The amounts, with debits and credits, always equal
- A brief, specific description of the transaction
- A reference number or link to supporting documents (like an invoice or receipt)
At this stage, accuracy and clarity matter. If anything is unclear in the journal, it can create confusion later when it’s time to post to the general ledger or prepare reports. A well-kept journal becomes the backbone of clean books and audit-ready records.
Step 7: Confirm Accuracy In The General Ledger
Once your journal entries are recorded, the next step is to verify and post them to the general ledger. This is where each account, cash, accounts receivable, sales revenue, utilities expense, and so on, gets updated.
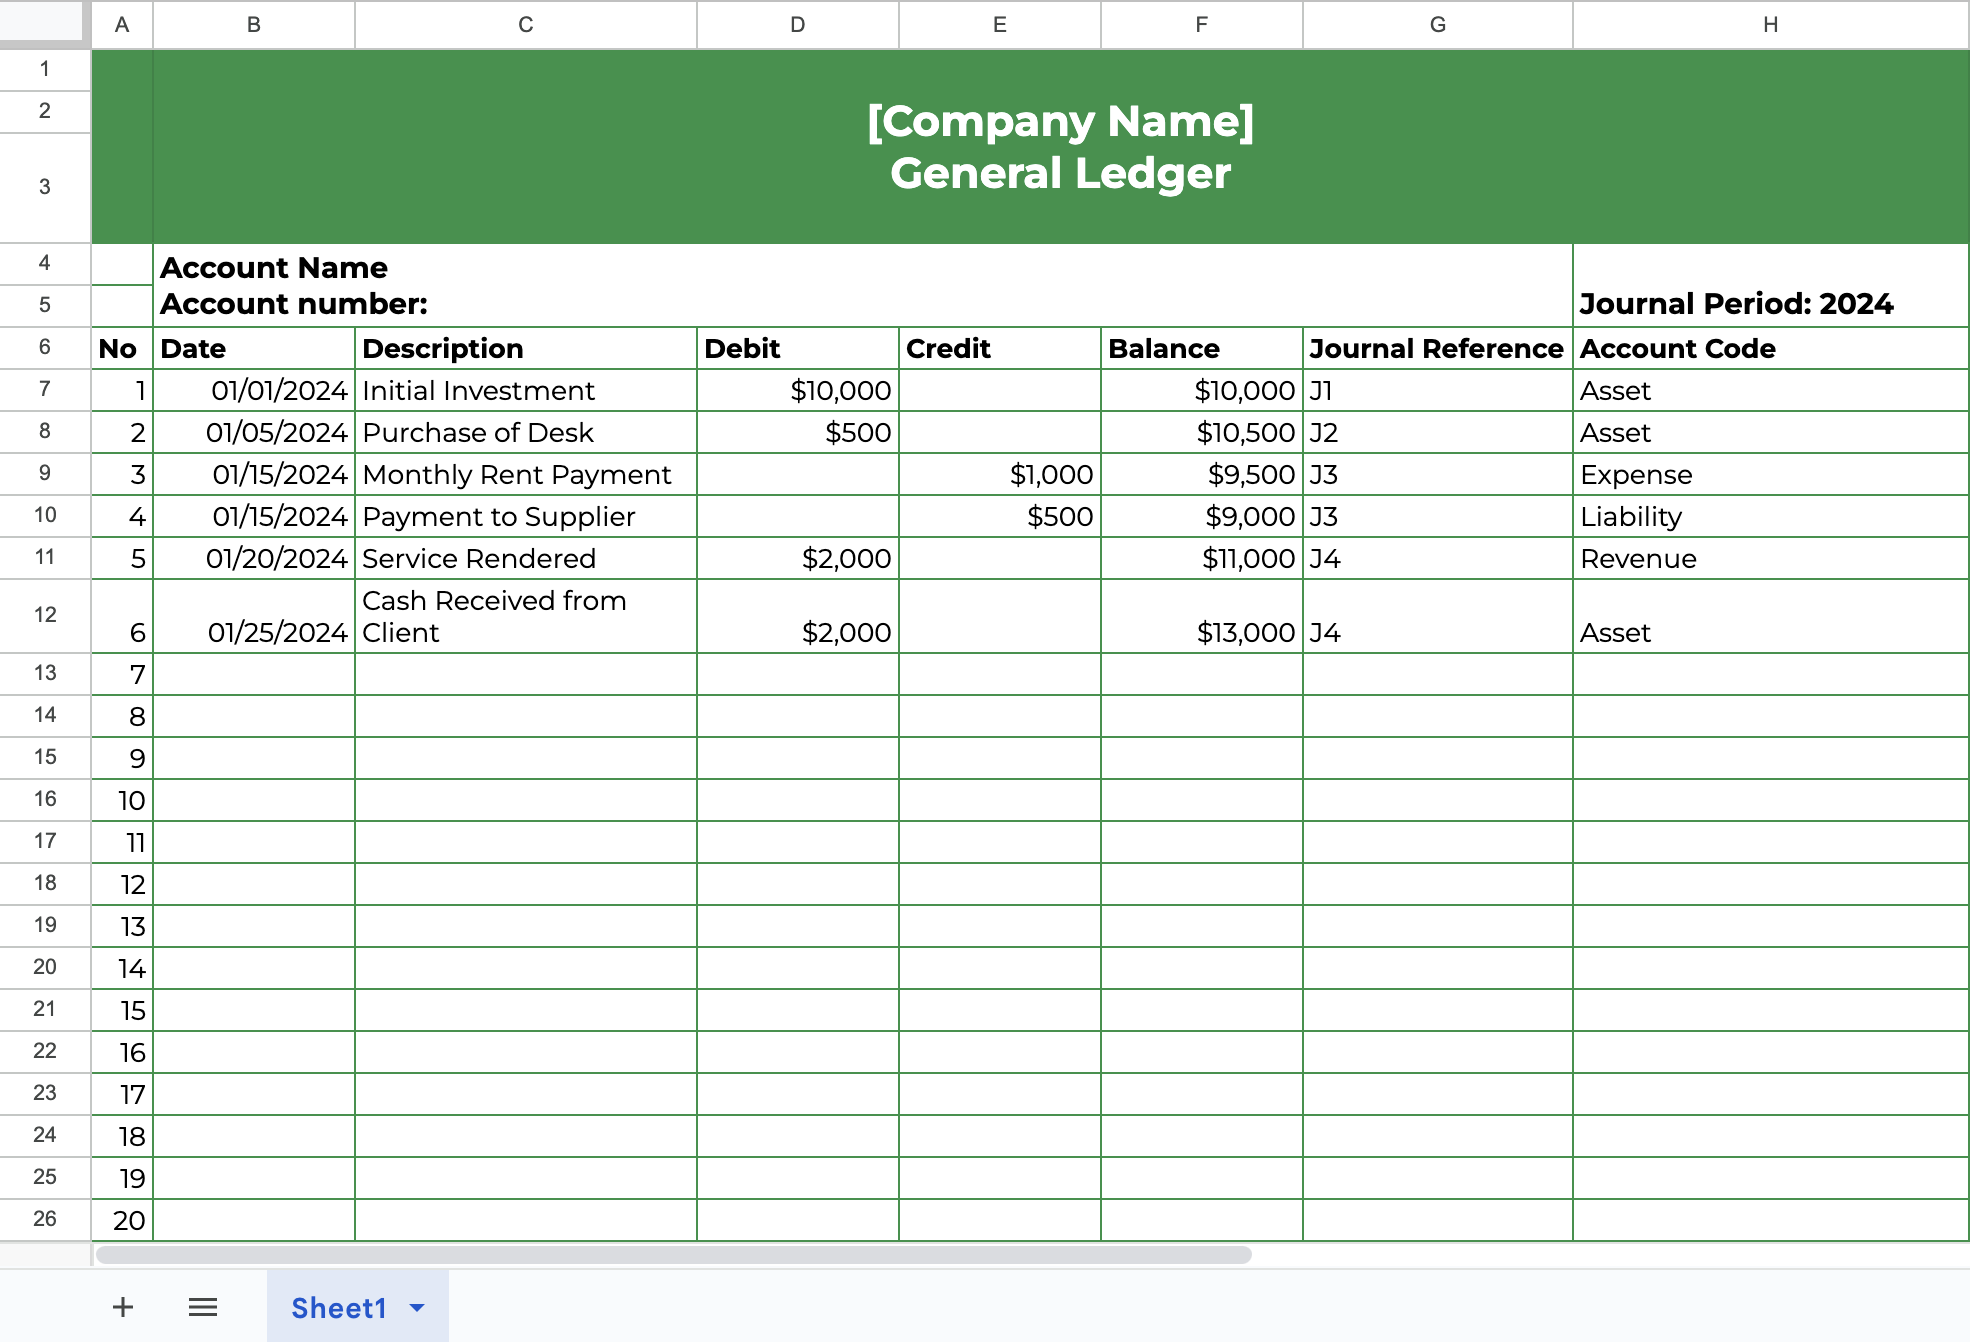
Think of the general ledger as the master record of all your account activity. While the journal captures the story of each transaction, the ledger organizes that story by account. It answers the question: ‘What’s the current balance of this specific account?’
For each journal entry, you’ll find the affected accounts in the ledger with the debit or credit amounts. Each posting includes the date, reference number, and a brief description. Over time, as you post more transactions, the ledger builds a running balance for each account. This makes it easier to track trends, spot discrepancies, and prepare accurate reports because everything is grouped where it belongs.
Further Reading: General Ledger: Purpose, Format, and How It Works
Download: Free Accounting General Ledger Template
Step 8: Prepare a Trial Balance
Once you’ve posted all your journal entries to the general ledger, the next step is to prepare a trial balance. This is where you pause and check that everything is still in balance before moving on to financial reporting.
The trial balance lists all your ledger accounts along with their ending debit or credit balances. When you total up both columns, debits on one side and credits on the other, they should be equal.
If the totals don’t match, it’s a red flag. Something didn’t get recorded correctly: maybe a transaction was only entered once, or a debit and credit were flipped.
Whatever the issue, the trial balance allows you to spot and fix it before it impacts your financial statements.
Why Does Double-Entry Accounting Matter?
Double-entry accounting does more than organize debits and credits. It strengthens the foundation of your entire accounting process.
1. Accuracy and Error Detection
Double-entry creates a natural accuracy check. Every transaction must balance, so if your debits and credits don’t match, you know something’s off immediately. That built-in logic helps you catch mistakes early before they flow into financial statements or client reports.
2. Fraud Prevention
When records must be updated in at least two places, it’s harder for fraudulent transactions to slip through unnoticed. Gaps, inconsistencies, or one-sided entries raise red flags. In this way, double-entry accounting supports internal controls and accountability.
3. A Full Picture of Financial Activity
Each transaction tells two stories. You’re not just recording what was spent, you’re recording where it came from and why. That dual view gives you a more complete financial narrative, so you can track sources, uses, and outcomes all in one system.
4. Better Decision-Making
Accurate, balanced records lead to clearer insights. It doesn’t matter if you’re advising a client, planning for growth, or preparing for tax season, double-entry ensures the numbers reflect reality. That’s what makes reports trustworthy and decisions smarter.
5. Compliance and Audit-Readiness
Double-entry accounting aligns with IFRS and tax regulations. When your books are balanced and properly documented, audits become smoother, tax filings more accurate, and compliance far less stressful.
Double-entry vs. Single-entry Accounting
While double-entry is the gold standard for most businesses, it’s not the only system out there. Some smaller businesses or sole proprietors may use single-entry accounting, which is simpler but comes with limitations.
What Is Single-Entry Accounting?
Single-entry accounting records transactions in only one account. Think of it like a basic checkbook: you log money in or money out, but you don’t track both sides of the transaction. There are no debits and credits, just a list of receipts and payments.
It’s straightforward, but it lacks the detail and checks that double-entry provides.
Key Differences
Double-entry offers more structure and clarity, which is critical as a business grows. It supports accurate financial statements, better error detection, and compliance. Single-entry may work for microbusinesses, but it doesn’t scale well.
Here’s a quick comparison:
| Feature | Double-entry Accounting | Single-entry Accounting |
| Number of Entries per Transaction | Two or more (debit and credit) | One |
| Tracks Financial Position | Yes – full balance sheet and income statement support | No – usually only tracks cash flow |
| Error Detection | Built-in (through trial balance) | Limited |
| Complexity | More complex, but more accurate | Simpler, but easier to overlook mistakes |
| Best Suited For | Small to large businesses, especially those needing reports or audits | Very small businesses, freelancers, or personal finances |
| Compliance | GAAP and IFRS compliant | Not compliant with most formal accounting standards |
Double-Entry Best Practices
If you’re running an accounting or bookkeeping firm, you already know that keeping client books accurate isn’t just about knowing the rules; it’s about applying them consistently, across multiple clients, ledgers, and team members.
Here’s how successful firms use double-entry accounting effectively at scale:
1. Use General Ledger Software That Does the Heavy Lifting
Manually managing debits and credits is no longer realistic when you’re serving multiple clients. Cloud-based general ledger software like QuickBooks, Xero, or Sage automates entries, enforces the double-entry structure, and makes reporting a breeze.
These platforms ensure that every transaction impacts at least two accounts, so nothing falls out of balance. They also simplify bank reconciliations, categorize income and expenses, and produce audit-ready financials. Your team spends less time on data entry and more time reviewing insights and supporting clients.
2. Standardize Workflows with Practice Management Software
Double-entry is only as reliable as the processes behind it. That’s where practice management software comes in. Tools like Financial Cents help you:
- Assign responsibilities across your team
- Keep everyone accountable to deadlines
- Manage recurring tasks like monthly closes and reconciliations
- Request documents and approvals from clients
- Standardize how bookkeeping work is done across the firm
- Track the status of client deliverables
When your workflows are clear, the risk of skipped journal entries, unposted adjustments, or incomplete reconciliations goes down significantly. Everyone knows what needs to be done and when.
3. Implement Internal Controls and Regular Reviews
No matter how skilled your team is, things can slip through without a review process. Building in layers of internal controls ensures your double-entry system stays strong.
That might include:
- Checklists for monthly closes and quarterly closes
- Exception reports to catch anomalies
- Peer review of journal entries and reconciliations
- Role-based access in your accounting tools
- Routine trial balance reviews and comparison to the general ledger are conducted before issuing financials
Conclusion
Double-entry accounting has stood the test of time for a reason. It’s a system built on balance, accuracy, and accountability, ensuring that every transaction tells the full financial story. But maintaining that standard across multiple clients takes more than just accounting knowledge; it takes efficient systems and clear processes.
That’s where Financial Cents comes in. It gives your firm the structure to stay on top of recurring tasks, streamline reviews, and manage your team’s workload, all while keeping client books error-free.
Use Financial Cents to manage your accounting firm processes.


