
If you’ve figured out how to prepare a trial balance, as we explained in this article, you already know how to confirm your accounts balance. If you’ve not read it, you can go over it here. The next step is to prepare the adjusted trial balance, ensuring that every account is accurate before the financial statements are created.
Why is this step necessary? Because before you can prepare reliable financial statements, your books need more than just a quick balance check. The trial balance confirms that total debits equal total credits, but that alone doesn’t guarantee your accounts tell the full story. Certain transactions, such as accruals, prepaid expenses, or depreciation, still require adjustments to accurately reflect the true financial position of your business.
Let’s dive deeper.
What is an Adjusted Trial Balance?
An adjusted trial balance is the internal report you put together after posting all your adjusting entries to the general ledger. These adjustments cover things like accrued expenses, accrued revenues, prepaid expenses, depreciation, or even corrections you catch during your review. Once you’ve made those updates, the adjusted trial balance shows every account with its new balance (debits in one column and credits in the other) so you can check that your books are still in balance.
For you, this step is a critical part of the accounting cycle. It’s the tool you rely on to make sure every account is accurate and up to date. From there, the adjusted trial balance becomes the foundation for your financial statements. The accuracy of those reports depends on how well you prepare your adjusted trial balance.
Why Is the Adjusted Trial Balance Important?
The adjusted trial balance is the last checkpoint that makes sure your books are accurate. Without it, you risk reporting numbers that look balanced but are wrong because adjustments weren’t made. Here’s why it matters:
1. Ensures Accounts Reflect Accurate, Up-to-Date Balances
It’s one thing for your books to “balance,” but it’s another for them to actually tell the truth about your business. When you prepare an adjusted trial balance, you’re not just checking the math; you’re updating your accounts so they tell the right story.
Without those adjustments, your numbers can be misleading. Your revenues might look lower than they should, your expenses might be understated, or your assets might be overstated. On paper, your books would balance, but the picture they paint wouldn’t be accurate.
2. Helps You Catch Discrepancies Early
The adjusted trial balance gives you one last chance to spot errors before they flow into financial statements. If something looks off (for example, an unusually high expense or a missing revenue entry), you can correct it now instead of explaining it to clients, auditors, or stakeholders later. This is useful if you are creating accounting compilations.
3. A Critical Step in the Accounting Cycle
The adjusted trial balance is the bridge that takes you from bookkeeping to real financial reporting. Up to this point, you’ve been recording transactions and making sure the math adds up. That’s important, but it’s not enough. Numbers that balance can still be wrong if adjustments haven’t been made.
This is where the adjusted trial balance earns its place in the cycle. It’s the step that makes sure your books don’t just “look right”, they are right.
Adjusted vs. Unadjusted Trial Balance
Before you can understand the adjusted trial balance, it helps to look at where it starts: the unadjusted trial balance.
An unadjusted trial balance is the version you prepare immediately after posting all your regular transactions to the general ledger but before making any adjusting entries. It shows whether your debits and credits are mathematically in balance, but it doesn’t account for accruals, deferrals, or other adjustments that reflect the true financial position of your business.
The adjusted trial balance, on the other hand, comes after you’ve posted those adjusting entries. It’s the version you use to prepare financial statements because it gives you the most accurate and up-to-date balances.
Here’s a simple comparison:
| Feature | Unadjusted Trial Balance | Adjusted Trial Balance |
| When Prepared | After posting all transactions to the ledger | After posting adjusting entries |
| Purpose | Checks if debits equal credits before adjustments | Ensures accounts are accurate and ready for financial statements |
| Includes Adjustments? | No | Yes (accruals, deferrals, depreciation, corrections) |
| Use in the Accounting Cycle | Preliminary checkpoint | Final checkpoint before preparing statements |
| Reliability for Reporting | Not suitable for financial statements | Used as the source for financial statements |
Rules for Preparing a Trial Balance
When you prepare a trial balance — whether unadjusted or adjusted — a few basic rules keep everything organized and accurate, following these ensures your trial balance is reliable and easy to read.
1. All Accounts Included
Every active account from your general ledger must be listed. This includes assets, liabilities, equity, revenues, and expenses. Even accounts with a zero balance should appear so that nothing is left out of the report.
2. Debit and Credit Columns
Separate debits and credits into clearly marked columns. This makes it easy to confirm that your books are in balance at a glance. Remember: assets and expenses typically carry debit balances, while liabilities, equity, and revenues usually carry credit balances.
3. Normal Balances
Every account type has a normal balance, which is the side where increases are recorded. Knowing this makes it easier to place amounts in the correct debit or credit column.
| Account Type | Normal Balance |
| Assets | Debit |
| Expenses | Debit |
| Liabilities | Credit |
| Equity | Credit |
| Revenue | Credit |
4. Summation
The debit and credit columns must always add up to the same total. If they don’t, it signals an error that needs to be tracked down and corrected before you continue.
5. Timing
Prepare the trial balance at the end of an accounting period, such as month-end, quarter-end, or year-end. This ensures you’re working with a complete set of transactions for that period.
6. Sequence
List accounts in the same order they appear in your chart of accounts: assets first, followed by liabilities, equity, revenues, and finally expenses. This structure makes the trial balance easier to navigate and aligns it with financial statement formats.
Steps to Prepare an Adjusted Trial Balance
Preparing an adjusted trial balance isn’t as intimidating as it sounds. Think of it as building on the work you’ve already done with your unadjusted trial balance. Each step brings you closer to financial statements that you can trust. Let’s walk through it together.
Step 1: Start with the Unadjusted Trial Balance
The first thing you’ll do is pull up the unadjusted trial balance, the one you created right after posting all your journal entries to the ledger. This version shows you where every account stands before any adjustments.
At this stage, your main focus is to make sure every account is listed and that the debits and credits are already in balance. If they aren’t, you’ll need to fix that first before moving forward. Only once your unadjusted trial balance checks out should you begin recording adjustments.
Step 2: Journalize and Post Adjusting Entries
Now that you’ve got your unadjusted trial balance as a starting point, it’s time to make the adjustments that bring your books up to date.
Take each adjustment, journalize it just like you would any other transaction, and then post it to the right accounts in your general ledger. For example, if part of your prepaid rent has expired, you’ll move that amount from the Prepaid Rent account to Rent Expense.
Step 3: Update the General Ledger
Once you’ve journalized and posted your adjusting entries, the next step is to update your general ledger. This is where those adjustments change the balances of your accounts.
For example, if you added an accrued salary expense, your Salaries Payable account will show up with the amount you still owe. By the time you finish, your ledger should be fully updated with all adjustments, which sets you up perfectly for creating the adjusted trial balance in the next step.
Step 4: Create the Adjusted Trial Balance
Now comes the payoff. With your general ledger fully updated, you’re ready to prepare the adjusted trial balance. This report pulls in every account (assets, liabilities, equity, revenues, and expenses) and shows their balances after adjustments.
List each account just like you did in the unadjusted trial balance, but this time include the updated balances. Place the debit amounts in one column and the credit amounts in the other. When you’re done, you should see a complete picture of your accounts as of the end of the period.
Step 5: Verify the Equality of Debits and Credits
The last step is to double-check your work. Add up the debit column and the credit column in your adjusted trial balance and make sure the totals are equal. If they match, that’s your confirmation that the books are balanced after adjustments.
If they don’t, don’t panic. It just means something was missed or entered incorrectly. Go back through your adjusting entries, review your ledger postings, and track down the error. Catching mistakes here is much better than letting them carry over into your financial statements.
Example of an Adjusted Trial Balance
The best way to understand an adjusted trial balance is to see it in action. So let’s walk through a simple example together.
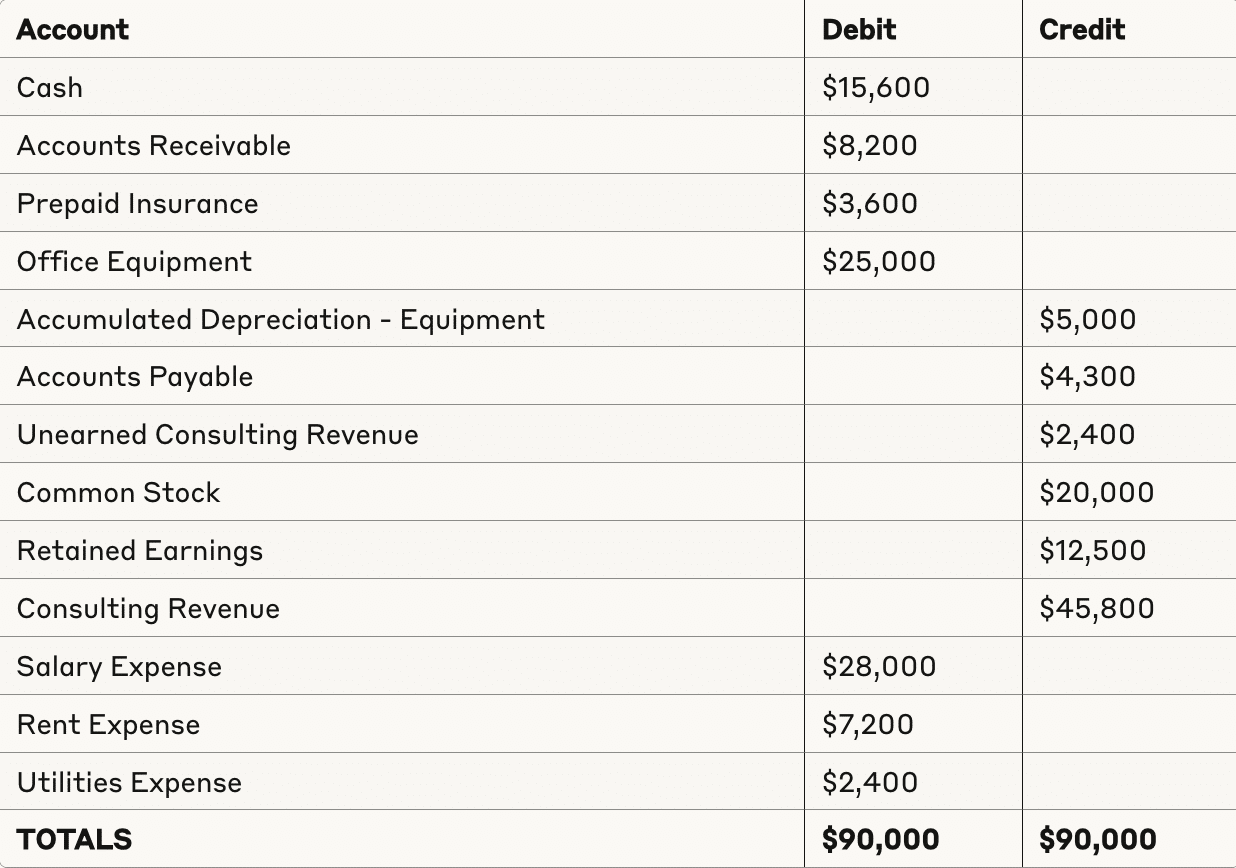
Let’s examine how Metro Office Solutions, a small business consulting firm, transforms its unadjusted trial balance into an adjusted trial balance at December 31, 2024.
Unadjusted Trial Balance
Metro Office Solutions
Unadjusted Trial Balance
December 31, 2024
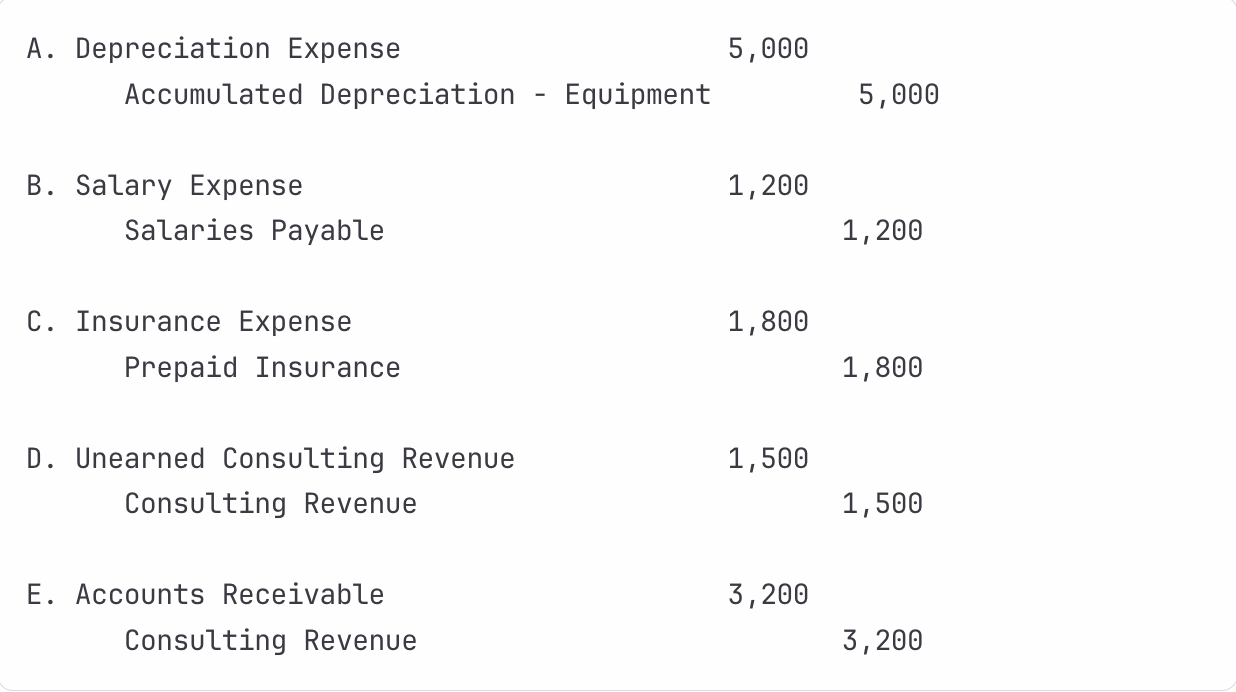
Required Adjusting Entries
After reviewing the accounts and supporting documentation, the following adjustments are needed:
Depreciation Expense: Office equipment with a cost of $25,000 has an estimated useful life of 5 years with no salvage value. Annual depreciation = $25,000 ÷ 5 = $5,000.
Accrued Salaries: Employees worked the last three days of December but won’t be paid until January 3. Daily salary cost is $400, so accrued salaries = $400 × 3 = $1,200.
Prepaid Insurance Adjustment: The company paid $3,600 for a 12-month insurance policy on July 1, 2024. Six months have expired by December 31: $3,600 × 6/12 = $1,800.
Unearned Revenue: Recognition of the $2,400 in unearned consulting revenue, $1,500 worth of services have been completed by year-end.
Accrued Consulting: Revenue Services worth $3,200 were completed in December, but the client hasn’t been billed yet.
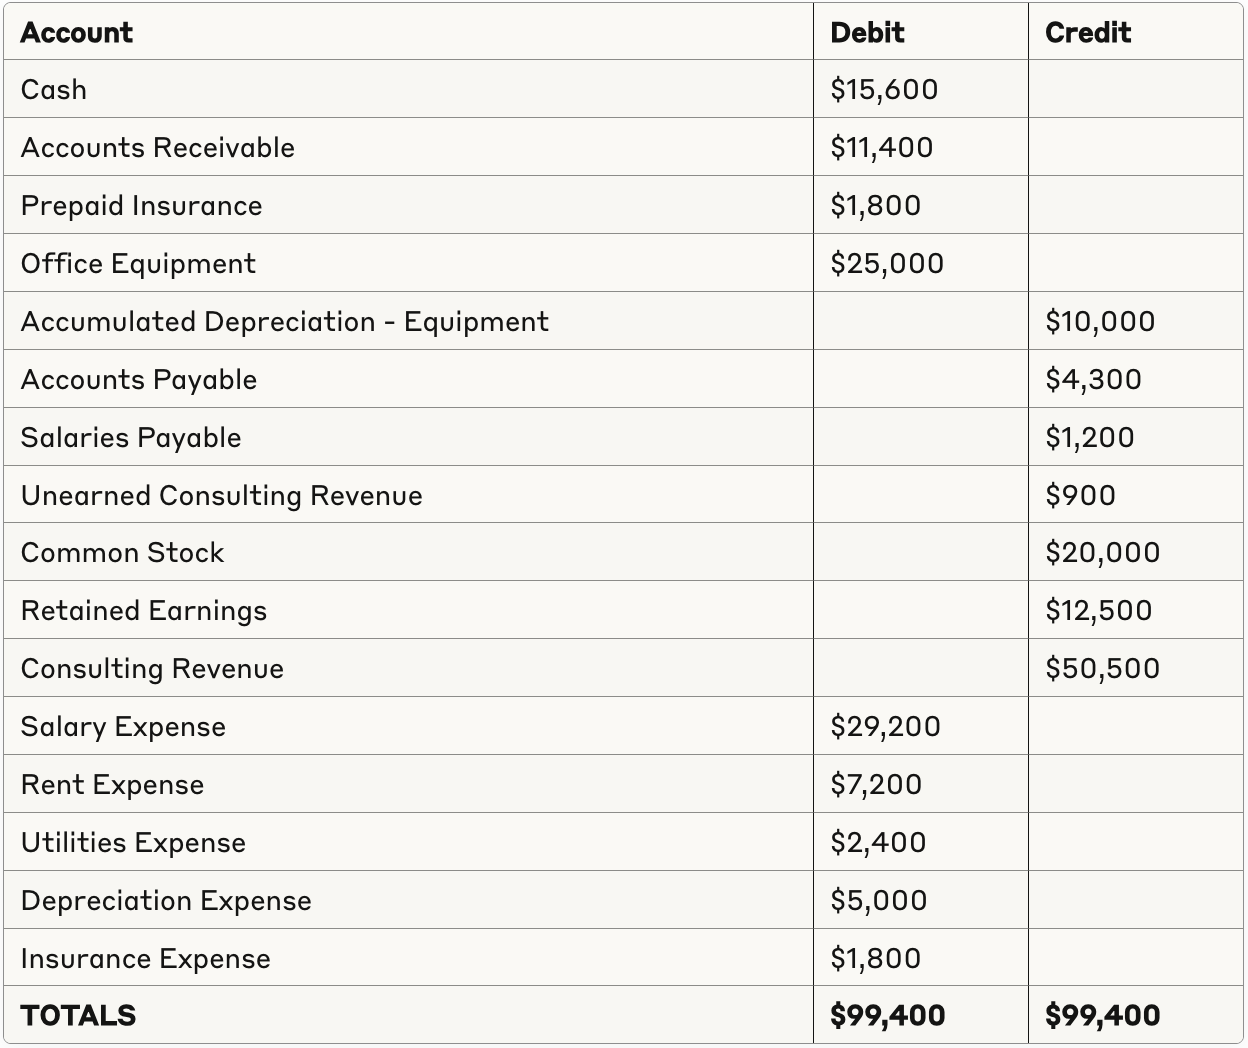
Adjusted Trial Balance
Metro Office Solutions
Adjusted Trial Balance
December 31, 2024
What Comes After the Adjusted Trial Balance?
Once you’ve finished your adjusted trial balance, you’re ready to move to the next stage of the accounting cycle: preparing your financial statements. This is where all the work you’ve done up to this point pays off.
Here’s how it flows:
- Income Statement: You’ll pull the revenue and expense balances from the adjusted trial balance to calculate your net income (or net loss) for the period. This shows how much your business earned versus what it spent.
- Balance Sheet: You’ll take the updated asset, liability, and equity balances to show the financial position of your business at the end of the period. Net income from your income statement flows into equity here, which ties everything together.
- Cash Flow Statement: Although it’s prepared separately, many of the figures come directly from the adjusted trial balance, helping you show how money moved in and out of your business.
So in simple terms, the adjusted trial balance gives you the numbers, and the financial statements tell the story.
Best Practices for Preparing an Adjusted Trial Balance
Preparing an adjusted trial balance is straightforward, but following best practices will save you time and ensure your numbers are reliable. Here are a few tips to keep in mind:
1. Document Every Adjusting Entry Clearly
Always write clear descriptions for each adjusting entry. This makes it easier for you (or anyone reviewing your work) to understand why the adjustment was made and prevents confusion later.
2. Use Standardized Templates
Working with a consistent format reduces errors and keeps your trial balances easy to read. Templates also help ensure you don’t accidentally leave out an account or column.
3. Reconcile Accounts Beforehand
Take the time to reconcile key accounts, such as cash, receivables, and payables, before preparing the adjusted trial balance. This step helps you catch errors early.
4. Double-Check Your Math
Even small calculation errors can throw your trial balance off. Re-add your debit and credit columns and confirm totals match before moving forward.
5. Perform a Reasonableness Check
Look at the balances and ask yourself if they make sense. For example, does the rent expense align with your lease? Does depreciation reflect the asset’s value and useful life? These quick checks can uncover mistakes that numbers alone don’t reveal.
6. Leverage Accounting Software
Modern accounting software can automate many of these steps, reduce the risk of error, and save you time. Use technology to handle repetitive calculations so you can focus on reviewing and analyzing results.
Conclusion
The adjusted trial balance is your final checkpoint before financial statements are created. It doesn’t just prove that your debits and credits match, it shows that your accounts are fully updated with adjustments for things like accruals, deferrals, and depreciation. In other words, it’s not just about number-crunching. It’s about having solid, repeatable processes in place to keep your books accurate, reliable, and compliant.
The challenge, of course, is that getting to this point often involves a lot of manual, recurring tasks. From chasing down client documents to keeping track of deadlines, it’s easy for things to get muddled. That’s why having strong systems and automation in place is key if you want consistency and peace of mind.
Instead of wasting time on manual tasks, you can let Financial Cents handle the heavy lifting. It’s workflow automation built specifically for accounting and bookkeeping firms, helping you stay organized and on top of every project. With Financial Cents, you can:
- Automate recurring projects so deadlines never get missed
- Collect documents from clients automatically, without endless email follow-ups
- Use task dependencies to keep work flowing in the right order
- Standardize processes with workflow templates your whole team can follow
Explore how Financial Cents can streamline your workflow automation.


