
It’s that time again. You have to switch software, and you’re already dreading it, because you know a change like this can affect every part of the firm: active client work, deadlines you can’t move, client communication and collaboration, and the habits your team has built around the current tool.
That dread is understandable, and it’s a big reason firms delay switching for as long as they can. The problem is that the system you’re holding on to causes its own disruption. It slows your team down, makes it harder to scale, and creates friction with clients, which is similar to what you’re trying to avoid.
So the better move is to switch, and to do it in a way that keeps the disruption low. There’s a method to that, and this article walks you through it, with a complete accounting software implementation checklist and a free downloadable version you can use to efficiently roll out the new software to your team.
TL;DR
- Implementing new accounting software involves moving your firm to a new system without disrupting client work and ensuring your team actually uses it.
- You know it’s time when your current system is manual, can’t keep up as you grow, is missing features you now need, or wasn’t built for accounting work.
- There are five phases to implementing software successfully: plan and set requirements, prepare and migrate your data, configure the system and build your templates, train your team and tell clients what changes, then review adoption 30 days after launch.
- To reduce disruption, launch during a quieter period, soft launch with a few clients first, and keep your old system running until the new one is working well.
- Financial Cents is built for accounting and bookkeeping firms, and its passwordless client login reduces friction and makes the software easier for clients to adopt.
What Accounting Software Implementation Means for a Firm
Every firm manages client work through some kind of system—a way to track projects, collect documents, manage deadlines, communicate with clients, and hand work off between team members. Maybe yours is manual, built on spreadsheets and email threads. Or it’s a generic project tool like Asana or Monday.com. Or an accounting-specific platform that never quite fits your firm.
Accounting software implementation is everything you do to move your firm onto a new system and get your team using it. That means planning the switch, migrating client data, configuring workflows, training staff, and checking back weeks later to see whether the change held.
The accounting practice management software implementation checklist we share works wherever you’re starting from and will help you introduce new software in a way your team can adopt, so the switch improves your firm’s performance instead of hurting it.
Signs Your Firm Needs to Implement New Accounting Software
A few things tend to signal it’s time to migrate to a new practice management software, like:
Your Team Tracks Deadlines in Spreadsheets and Inboxes
The first sign is if you’re still managing client work in spreadsheets and email. It works fine at first, but as your client list grows, so does the information you have to track. You start losing documents, asking clients for things they already sent, and missing deadlines.
Your Current System Can’t Handle More Clients
Another sign is when your system starts to struggle as you add clients. If it wasn’t built for a firm your size, it gets slower and less reliable the more you grow. You then spend your time fixing problems, which shouldn’t be the case.
You’re Missing Features You Now Need
As your firm grows or you add new services, you need features you didn’t need as a smaller firm, like capacity management to distribute work evenly among your team or recurring project automation, so your team isn’t recreating the same project every month or quarter. These are features your current system might not have, especially if it’s a generic project management system.
It Doesn’t Connect to Your Other Tools
Software that doesn’t integrate with the tools you already use means your team enters the same information twice or even more in different systems. That’s more work to do, and a higher chance of making errors.
Your Team Finds It Too Complicated to Use
If your current system is too complex for your staff, they won’t use it consistently. They’ll go back to the manual way instead, which takes more time and creates more errors. So you end up paying for a tool that people aren’t using, which defeats the whole purpose.
Your Clients Notice the Disorganization
Sometimes the clearest sign comes from your clients, as a bad system affects them too. For instance, you ask for a document they already sent, or they have to email you for a status update because they have no way to check on their own. That’s a frustrating experience, and enough of it will cost you the client.
Support Doesn’t Understand Accounting Work
If your software wasn’t built for accounting firms, the support team won’t fully understand your work and know how to help you resolve certain accounting issues. This is not a problem you’ll face with software that caters specifically to accounting firms.
Read: Best accounting practice management software
The Complete Accounting Software Implementation Checklist
We’ve grouped software implementation into five phases. Work through them in order, because each phase depends on the one before it.
Phase 1: Planning and Setting Requirements
The first phase happens before you buy anything, or before you set anything up if you’ve already chosen a tool. It’s where you work out what you need and when you’ll implement it.
Start by auditing your current tools and workflows. List everything your firm uses to manage client work, including the spreadsheets and emails, and note what each one does. This shows you what the problem is, so you can define exactly why you’re switching. Be specific about your reason here—more features, a scalable system, better user experience—so you know what to measure after you launch.
Your audit also tells you the accounting practice management features and integrations you need most, and what changes for clients, so you can prepare how to inform them.
Then pick one person to own the rollout. This can be anyone in the firm, so long as they’re familiar with your firm’s processes and your team respects them. If you can afford it, Ryan Lazanis, CPA (Founder, Future Firm) advises hiring operational help since you can’t do it alone. “You’re too busy, and it’s going to take time to update and be on top of the process. It’s a heavy task,” he says. That help can be a virtual assistant, a fractional online business manager, or a director of operations.
After this, choose your launch window. It’s better to schedule the launch for your quieter weeks rather than busy seasons, so you have fewer deadlines to work around and less risk to client work.
Phase 2: Pre-Implementation and Data Preparation
This is where you start preparing your data to move. Don’t wait until launch week; start as soon as you’ve chosen a tool.
First, export a full backup of what you have now, including client lists, documents, notes, time entries, and anything else your current system holds. You’re about to delete and reorganize records, so you want the original somewhere safe before you start.
Now, clean your data because you don’t want to work with dirty data in the new system. Go through your client list and archive duplicates, records past their retention date, and information that’s out of date or wrong. Also, decide what’s worth bringing across at all, since you won’t need every old document, password, note, and accounting workflow in the new system.
Once that’s done, map your fields between the two systems, so you know where everything in the old system lands in the new one. The structure will likely be different, so work out how you’ll arrange everything before importing.
Lastly, confirm that the new software integrates with the tools you use, such as QuickBooks, email, Zapier, e-signatures, or billing. You don’t want to have to work in different systems.
Phase 3: Setup, Workflow Templates, and Integrations
Phase 3 involves how you should configure the new system before inviting everyone in. First, set up your firm’s settings and profile. That’s your services, your team members, your client types, and whatever fields your firm uses to organize work.
Then create service templates for accounting recurring work, like monthly bookkeeping, quarterly close, tax prep, payroll, and client onboarding. Each one should have the steps your team follows, in order, with the right person assigned to each. You can create and save these templates in an accounting workflow software like Financial Cents.
With all of that built, connect the integrations you confirmed in Phase 2 and configure them properly. Then test the whole thing to make sure it’s working well. You can even run a real workflow from start to finish, test dashboards/views for owners, managers, and staff, send automated client requests and reminders, test notifications, automate recurring projects, and so on. You want to ensure everything is in order before everyone comes on board.
Phase 4: Training, Client Communication, and Go-Live
Now, it’s time for your team to actually use the software. You need to teach them how to use it, but don’t train everyone at once. Start with your admins and give them enough time to learn it properly, so they’ll guide others. Then write SOPs while everything is still fresh. Keep these short, about a page per service, covering how each type of work runs in the new system, and store them somewhere your team can easily find them without asking.
Train the rest of your staff role by role and use real firm scenarios rather than generic feature walkthroughs. For instance, run an actual monthly bookkeeping client through the workflow from request to completed work. Focus on what changes in daily work, not just where the buttons are, so they truly understand how the software saves them time and effort.
Once your whole team is familiar with the software, bring clients on and soft-launch first if you can. Take a few of your most accommodating clients through the new system and fix whatever comes up while it affects only a handful of people, then tell the rest of your clients about the change.
Pro tip: Don’t completely deactivate your old system yet. Keep it inactive until after the next phase.
Phase 5: Post-Implementation Review and Optimization
In this final phase, you improve what you built. After 30 days, check in with your team and your clients to see how it’s going. Has anyone gone back to the old way, whether that’s a spreadsheet running alongside the new system or client documents still arriving by email? If they have, find out why and fix it.
Then look at the reasons for switching you chose in Phase 1 and check to see if that has improved. Thirty days isn’t long enough for a full picture, but it’s long enough to see whether things are moving in the right direction.
Update your workflow templates and SOPs while you’re there, since things have probably changed. Keep checking in and improving the system until it’s stable and working well. Only then should you deactivate the old system.
Download: The Free Implementation Checklist
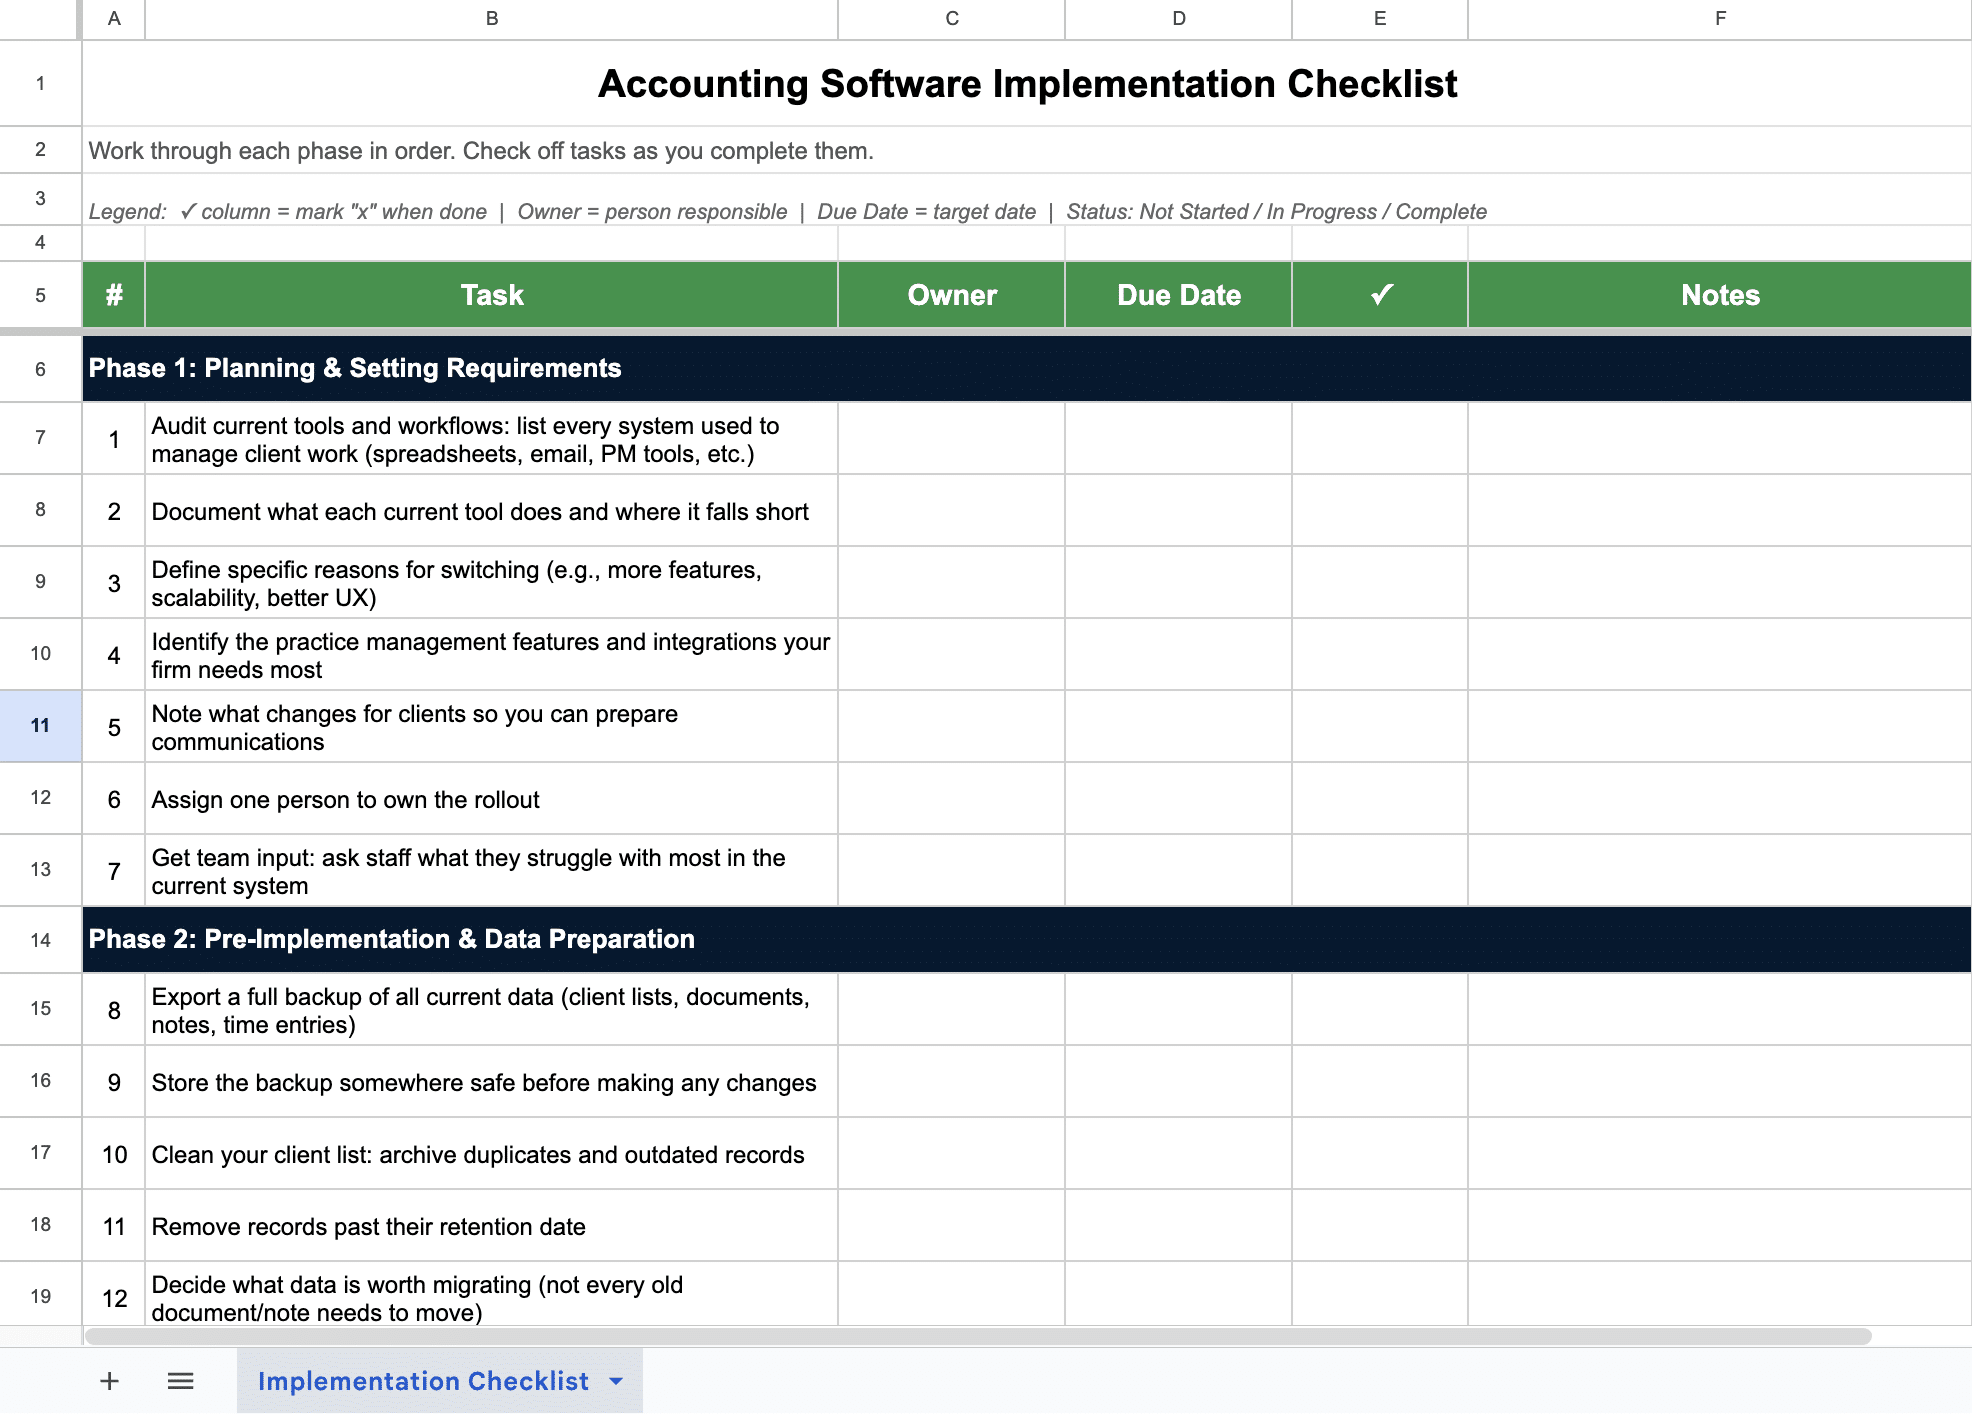
We’ve compiled all five phases above into a checklist you can download and work through step by step.
Common Practice Management Software Implementation Mistakes to Avoid
There are certain mistakes to avoid when selecting practice management software. The most common ones are:
Choosing Software Based Only on Price
Many firms choose the cheapest tool, and while affordability should be a factor in your decision, it shouldn’t be the only one. A tool that costs less but doesn’t do what your firm needs will cost you more eventually in time and money.
See an industry overview of what accounting practice management software costs.
Skipping Team Input
Your staff use the current system more than you do, so they know what they struggle with most. That’s why you should consult them before you choose a tool. Otherwise, you’ll buy something that doesn’t match how they work, and they’ll go back to the old way within a few weeks.
Recreating Broken Workflows in the New Tool
New software won’t fix a process that was already broken. If a workflow wasn’t working in your old system, don’t rebuild it in the new one. Fix it first, or you’ll carry the same problem across. As Ryan Lazanis puts it, “Only put technology in place once you have the process in place. If you’re applying technology to ill-defined processes, it could cause a bigger mess for you.”
See how to fix broken accounting workflows fast.
Failing To Tell Clients What’s Changed
Don’t let your clients find out about the change from an automated reminder telling them to log in to something they’ve never heard of. That’s a poor first impression of the new system and your firm. Tell them before you launch instead. Say what changes for them, show them what they’ll do differently, and be clear about how little it asks of them. The easier you make it to start, the more likely they are to use it.
Read this best practices accounting communication guide.
Treating Launch as the Finish Line
Teams often go back to the old way after a few weeks, and you won’t know unless you check. So check in 30 days later to see whether they’re using the tool fully, then fix whatever is getting in the way. Do this for a while until there is full adoption.
How Financial Cents Makes Software Implementation Easier
Financial Cents was built specifically to help accounting and bookkeeping practices grow. Firms find it easy to use, which is what earned it a 4.9/5.0 ease-of-use rating on Capterra and Capterra’s Best Ease of Use badge in the accounting practice management software category for 2026. That matters during implementation, since a tool your team finds hard to use is one they’ll find alternatives for.
Shannon Theis, owner of Payroll Solutions Plus, had tried two other tools that her team found too complex to use. It wasn’t until they switched to Financial Cents that the whole team adopted the software.
Here are the core features of Financial Cents.
- Passwordless login: Your clients don’t need a username or password to use Financial Cents. It sends them a magic link instead, which they can use to access the portal.
- Central workflow dashboard: See every client project, its status, its due date, and who it’s assigned to in one view, so you can track everything happening in your firm.
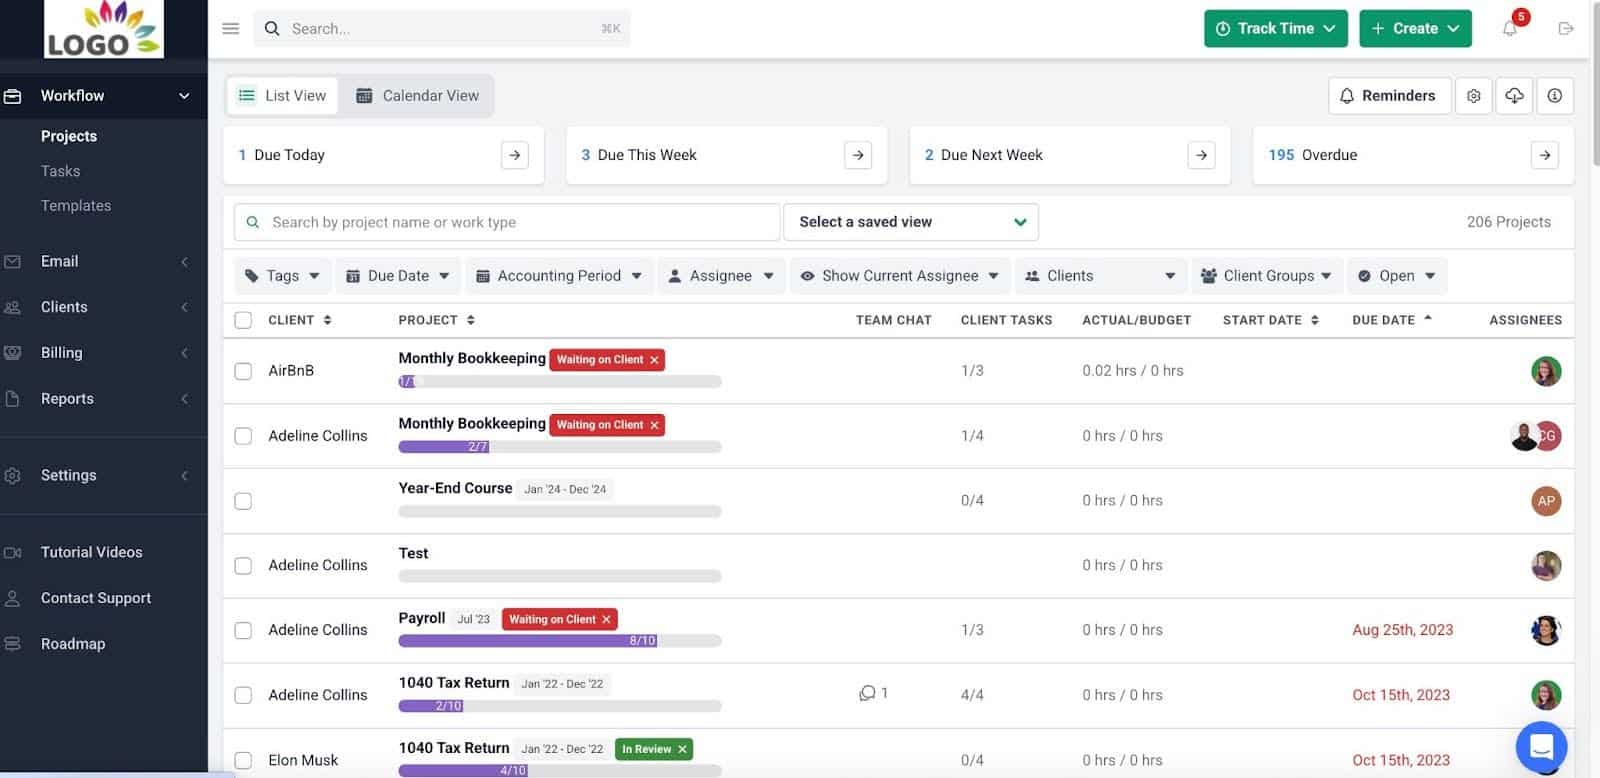
Stacey Feldman, CPA, Chief Operating Officer at Full Send Finance, loves this feature.
- Templates: Create and save your own templates for work like your month-end close checklist, tax prep checklist, payroll checklist, and client onboarding checklist, so the work runs the same way no matter who does it. Or start from the 400+ free templates in our library and customize them to your needs.
- Accounting workflow automation: Financial Cents automates recurring project creation, so monthly and quarterly work is generated on schedule instead of someone remembering to create it. You can also set it to send customized emails to clients when your team completes a task.
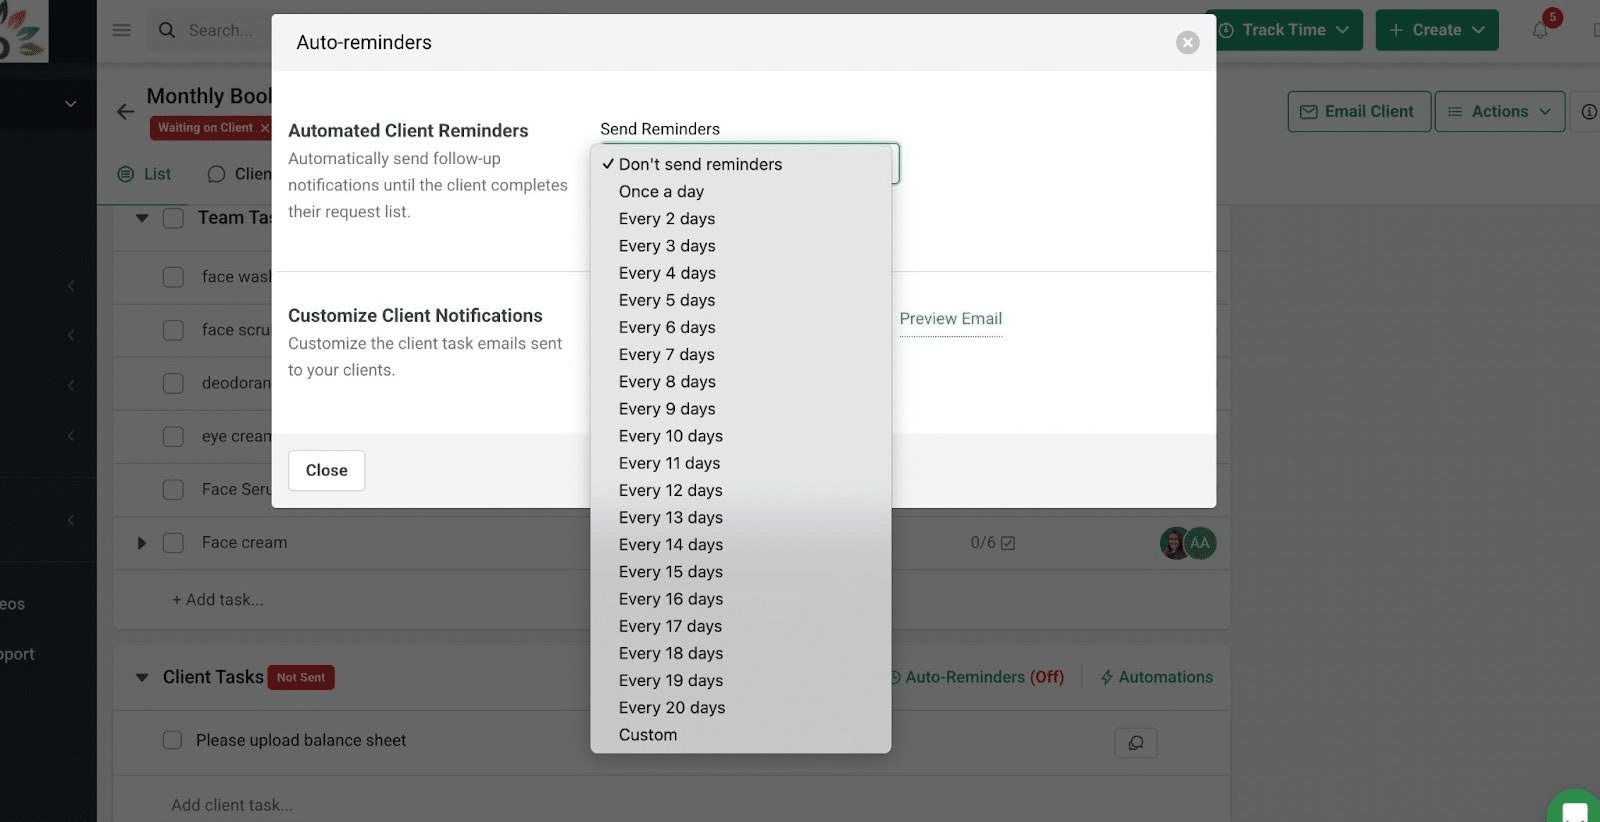
As Kim Ritter, owner of Ritter’s Tax & Accounting Services, says:
- Integrations: Financial Cents lets you connect the tools you already use, including QuickBooks, Gmail & Outlook, Google Drive, Zapier, and Adobe Sign.
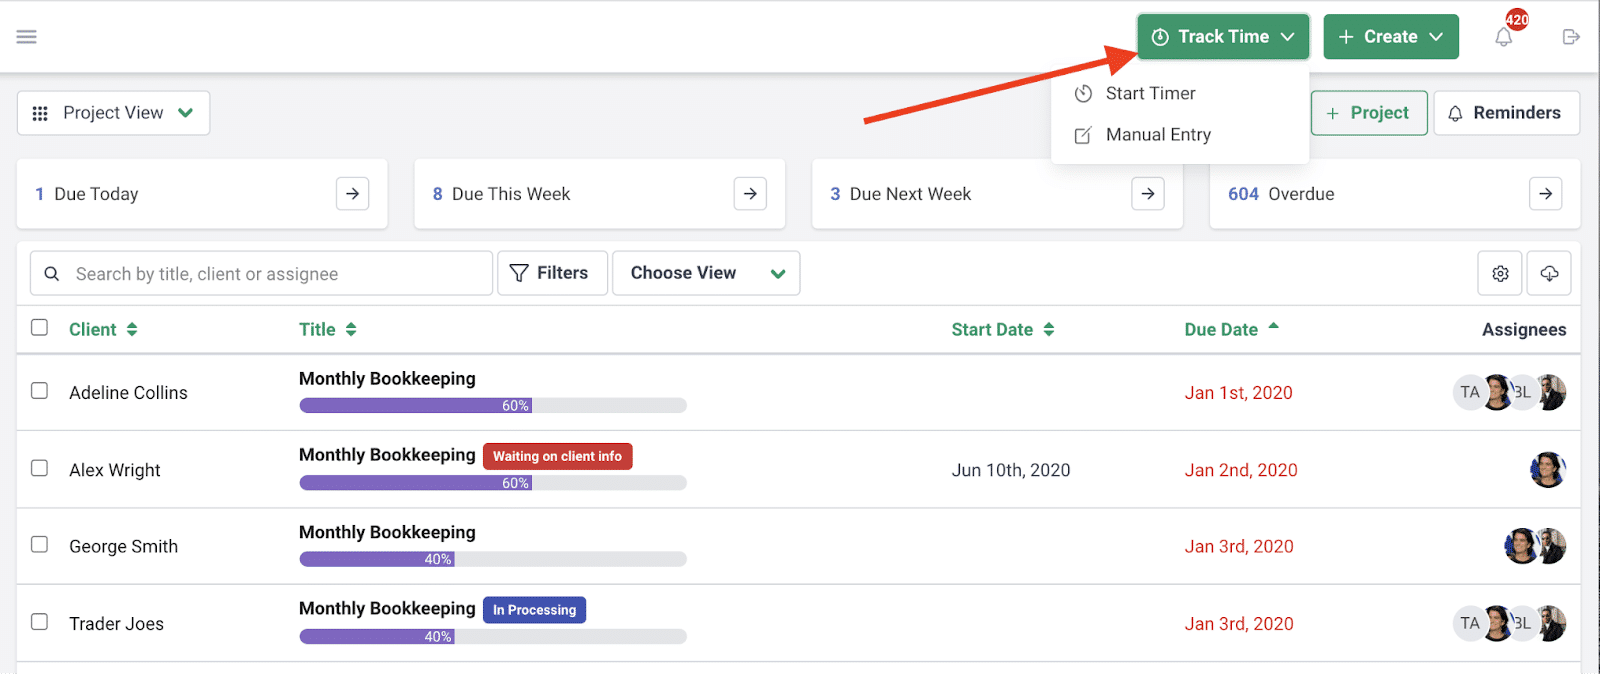
- Time tracking and billing: Track billable hours, invoice from those hours, and automate payments with Financial Cents’ integrated accounting billing software in the same platform.
- Reports: Financial Cents includes reports for realization rate and profitability, utilization, work insights, client tasks, client uploads, revenue insights, and accounts receivable aging, so you can see how your firm is performing and make decisions about your accounting firm’s efficiency, profitability, and team capacity.
Ready to switch? Get a Free walkthrough of Financial Cents today. You’ll get migration help and training to set up your firm seamlessly.
Frequently Asked Questions
Share this article: